
Stumbling through a dimly lit garage isn’t just frustrating – it’s downright dangerous. Whether you’re searching for tools, working on projects, or simply parking your car, inadequate lighting can lead to accidents, damaged property, and wasted time. The days of flickering fluorescent tubes and shadowy corners are over, thanks to revolutionary super bright garage lights that transform these essential spaces into safe, efficient, and functional areas. This comprehensive guide will walk you through everything you need to know about selecting and installing modern garage lighting systems that combine powerful illumination with hassle-free installation. From understanding lumens to mastering quick mounting techniques, you’ll discover how a simple lighting upgrade can dramatically improve your garage’s safety, functionality, and overall appeal.
Why Upgrade to Super Bright Garage Lights?
Inadequate garage lighting poses serious safety risks that many homeowners underestimate. Dark corners and shadows can lead to trips and falls, while poor visibility during tool use or vehicle maintenance increases accident potential significantly. Traditional lighting solutions, such as fluorescent tubes or incandescent bulbs, compound these problems with their high failure rates and inconsistent illumination. According to the National Safety Council, proper lighting can prevent up to 60% of workplace accidents – a statistic equally relevant to home garages. Beyond safety, outdated lighting systems waste considerable energy, often consuming 3-4 times more electricity than modern alternatives while delivering inferior brightness. Super bright LED solutions transform garages into functional workspaces, offering crystal-clear visibility that enhances everything from detailed repairs to efficient storage organization. With these modern systems providing up to 50,000 hours of consistent illumination, the upgrade represents both a practical safety measure and a long-term investment in your home’s functionality.

Top Garage Lighting Options for Homeowners
LED Panel Lights
Modern LED panel lights represent the gold standard in garage illumination, delivering exceptional brightness while consuming up to 75% less energy than traditional fixtures. These slim-profile panels distribute light evenly across your entire garage space, eliminating harsh shadows and dark spots that plague conventional lighting systems. Most super bright garage lights in this category offer adjustable color temperatures, allowing you to switch between daylight white for detailed work and soft white for general use. Leading manufacturers like Hyperlite have pioneered advanced LED panels that combine superior brightness with smart integration capabilities.
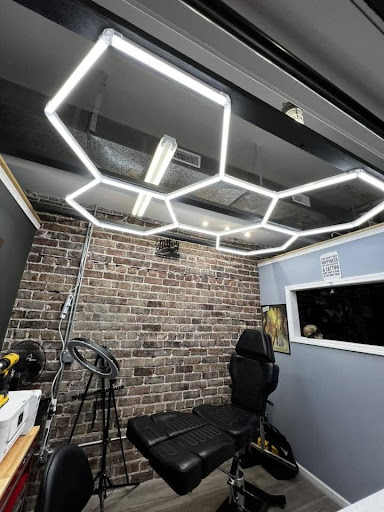
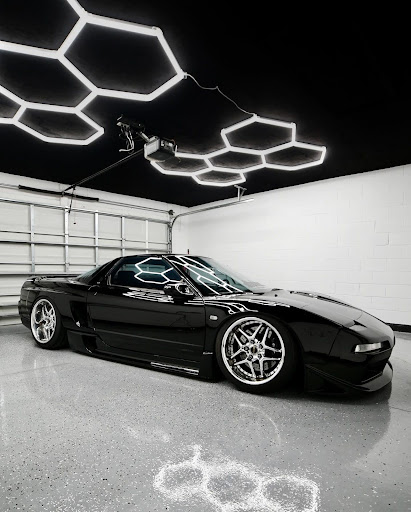
Hexagon Lights (Style + Function)
Hexagonal lighting modules combine contemporary design with practical functionality, offering a customizable solution that grows with your needs. These modular units can be arranged in various patterns to target specific work areas while creating an impressive visual impact. Their geometric design complements modern garage aesthetics while providing focused task lighting exactly where you need it.
Motion-Activated Fixtures
Smart motion-activated systems enhance both convenience and security. These fixtures automatically illuminate when you enter the garage and power down when you leave, potentially reducing energy costs by 30%. Advanced models feature adjustable sensitivity and duration settings, ensuring optimal performance whether you’re quickly grabbing tools or working on extended projects. The hands-free operation proves invaluable when carrying groceries or equipment, while also serving as an effective deterrent against unwanted visitors.
Critical Features for Easy Install Garage Lights
Understanding key installation features before purchasing ensures a smooth upgrade process. Plug-and-play systems offer the simplest solution, requiring only a standard outlet connection and basic mounting hardware. These systems typically include pre-wired components and quick-connect brackets, making them ideal for DIY installations. In contrast, hardwired systems provide a cleaner look and permanent solution but demand basic electrical knowledge or professional installation. Weight considerations are crucial for ceiling mounting – most modern LED systems weigh between 2-5 pounds and include reinforced mounting brackets rated for 3-4 times the fixture weight. Cord length requirements vary by garage configuration; optimal systems provide 6-8 feet of adjustable cord length with integrated cable management. When assessing electrical compatibility, verify your garage circuit can handle the additional load – most super bright garage lights draw 40-100 watts, significantly less than traditional lighting. On the DIY difficulty scale, plug-and-play installations rate 2/5, requiring only basic tools and 30-60 minutes, while hardwired systems rate 4/5, demanding electrical expertise and 2-3 hours for completion.
Step-by-Step: DIY Installation in 60 Minutes
Preparation & Safety
Before beginning installation, turn off power at the circuit breaker and verify with a voltage tester. Gather essential tools: sturdy ladder, level, pencil, drill with bits, screwdrivers, wire strippers, and safety equipment including gloves and protective eyewear. Clear the installation area and ensure adequate workspace around your ladder.
Mounting Process
Start by marking mounting bracket locations, using a level to ensure perfect alignment. For optimal weight distribution, locate ceiling joists using a stud finder and mark their positions. Install mounting brackets with heavy-duty screws, ensuring they’re rated for at least triple the fixture weight. Use a template if provided to guarantee precise spacing.
Wiring Simplified
For plug-and-play systems, simply route the power cord through provided cable management clips. When hardwiring, match wire colors carefully: black to black (hot), white to white (neutral), and green/copper to green (ground). Secure connections using included wire nuts, wrapping them clockwise until tight. Double-check all connections before closing the junction box.
Troubleshooting Common Issues
If lights flicker, verify all wire connections are secure and check switch compatibility with LED systems. Ensure proper grounding by confirming the ground wire is correctly attached to the mounting bracket or junction box. For motion sensors acting erratically, adjust sensitivity settings and clean the sensor lens. If lights won’t turn on, verify power at the breaker and check for loose connections at both fixture and switch ends.
Maximizing Value & Longevity
Regular maintenance ensures optimal performance and extended lifespan of your garage lighting system. Clean fixtures quarterly using a soft, dry microfiber cloth to remove dust buildup that can reduce light output by up to 30%. For stubborn grime, use a slightly damp cloth with mild soap, avoiding direct water contact with electrical components. While LED systems boast impressive longevity, track individual fixture performance through your smart home app or manual inspection, replacing any units showing significant dimming after 40,000 hours. Monitor monthly energy consumption through your home’s smart meter to identify any efficiency drops that might indicate maintenance needs. Create a seasonal checklist including connection tightness verification in spring, heat sink cleaning in summer, motion sensor testing in fall, and weatherproofing checks in winter. These simple steps protect your investment while maintaining peak illumination performance.
Transform Your Garage with Modern LED Lighting
Transforming your garage with super bright LED lighting represents one of the most impactful home upgrades you can make. Beyond the immediate benefits of enhanced visibility and safety, modern lighting solutions deliver substantial energy savings while creating a more functional and enjoyable space. The accessibility of plug-and-play systems has made installation remarkably straightforward, enabling most homeowners to complete the upgrade in just one hour. By following the guidelines provided – from selecting the right fixture type to proper maintenance procedures – you’ll ensure optimal performance for years to come. Don’t let poor lighting compromise your garage’s potential any longer. Take the first step today by assessing your current lighting setup and planning your upgrade using our comprehensive installation checklist. With minimal investment and effort, you can transform your dark, potentially hazardous garage into a bright, efficient, and safe environment that enhances both your home’s value and your daily life.